This post was originally sent via email for our Summer Knit Along.

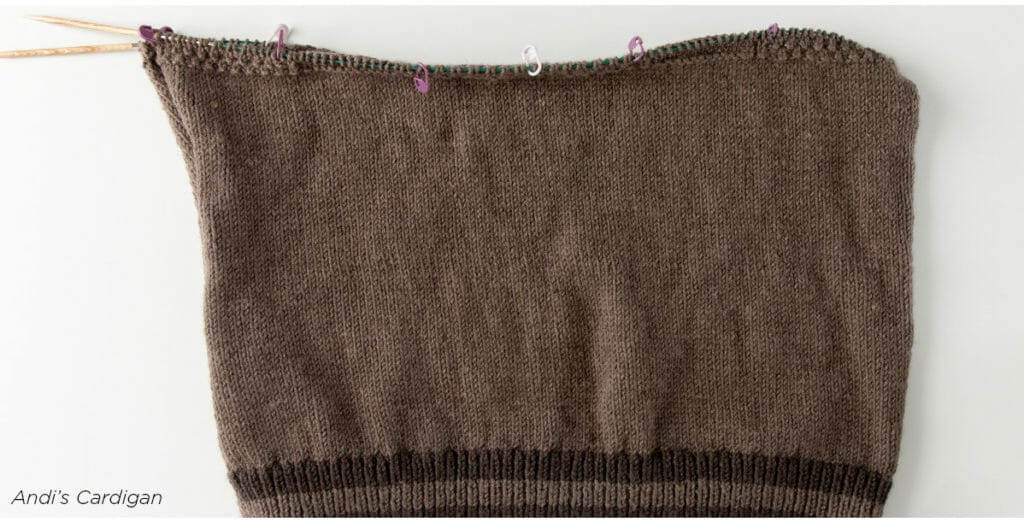
Once the body of your Game Day Cardigan reaches a certain length, it’s time to mark the sides and establish the textured stitch patterns. The first row after the stockinette creates the reverse stockinette ridge that frames the textured stitch patterns, and it’s the point to mark our left and right fronts and the back.
The pattern calls for a lot of markers to be used, so you may find it helpful to color code them for yourself! If you’re using our locking stitch markers like KP Staff Member Andi is using on hers, pick one color for the sides and another color for the stitch patterns to be added in the next row. Andi is using the light purple to mark her sides and the dark purple to mark the different stitch pattern sections.

Plan to take your time on the next row after the reverse stockinette ridge, because this is the point that establishes all of the panels. You will need to reference the stitch patterns written on the previous page as well as double checking your counts and placing the markers for the different panels. And don’t forget about the two selvage stitches used at each edge! If your stitch count is coming up wrong by two stitches on one of the fronts, double check the selvages are accounted for.
After all the markers are placed and the stitch patterns are established, the pattern has us work evenly in pattern for a few more inches, providing a nice opportunity to figure out your preferred method for keeping track of the two stitch patterns used at the same time. The Goal Panel is 6 rows long, and the Moss Stitch is 4 rows long, so they may need to be kept track of separately if you’re using counting row markers like Andi (more on that below) or hash marks like KP Staff Member Stacey prefers. If you’re a chart fan, you can also draw yourself a 12-row chart with both stitch patterns to capture every row variation you might encounter, and use a chart keeper to guide you.
Using Counting Stitch Markers
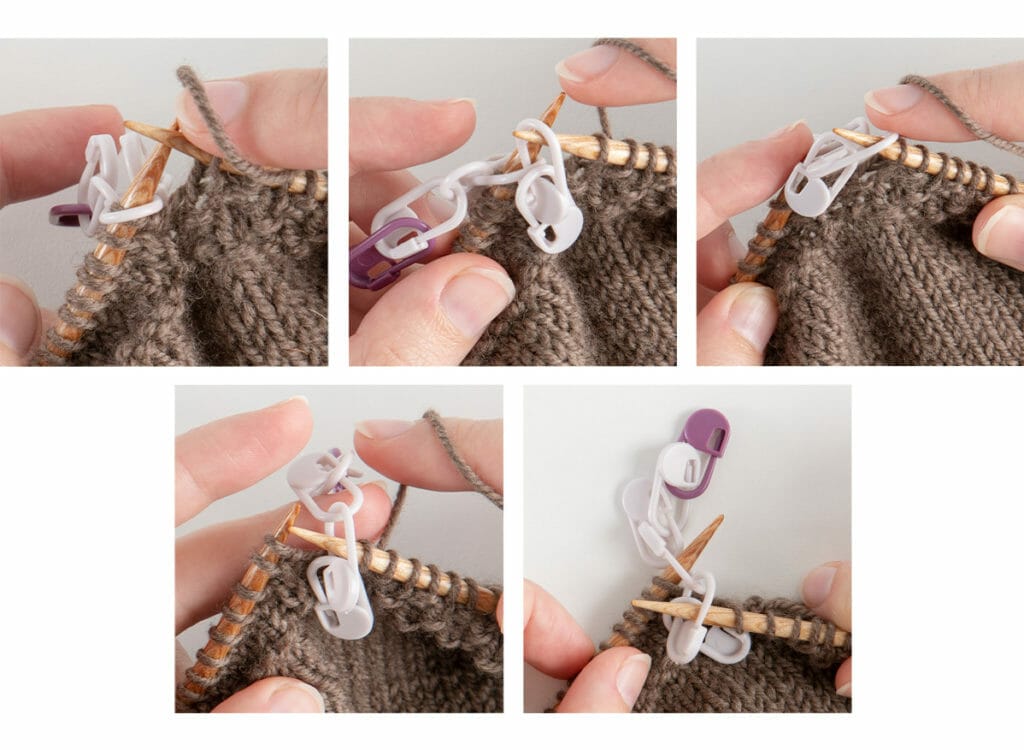
Counting stitch markers are easy to DIY using locking stitch markers! Choose a color to represent Row 1, and chain together as many additional markers as needed for the number of rows in the stitch pattern repeat. On every row, when you reach your counting stitch markers, instead of slipping the marker on your left needle to your right needle, you’ll insert your needle into the marker below the current marker and drop the old marker off your needle. When you finish your repeat, the last marker in the chain will be on your needles, and the chain can be flipped to the color marker that represents Row 1 to start a new repeat! Simply counting the chain from the Row 1 marker will let you know which row of your repeat you’re on.

Dividing the Body
When your sweater is the ideal length, the body is divided. Although you can start the Right Front by turning and working with the remainder of your stitches waiting on the needles, eventually stitches must be placed on holders, off your needles. Using a stitch holder is an option for the fronts, but the back will be too long for most stitch holders, so scrap yarn or and interchangeable needle cable are great alternatives. For scrap yarn, choose a yarn that won’t stick to your working yarn, like Dishie or Comfy! If you have an interchangeable needle set, you can use one of the IC cables and apply the end caps to secure your stitches after transferring. Using an IC cable has an added bonus, because you simply need to add your needle tips to the cable to begin knitting instead of transferring your stitches once again.
More Game Day Knit Along
Use the hashtag #KPGameDayKAL to see more posts on social media, and check out Knit Picks Podcast episodes from June 1st 2022-September 5th 2022, to hear about our hosts Lee and Stacey’s own Game Day cardigans in progress.


