


It doesn’t matter if you’ve completed over 200 pairs of socks (like the inspiring Frances Fisher, from last week’s podcast) or if you have just finished your first pair – every knitter knows the magic of a pair of handknit socks. These special handknits stand up to a lot of wear and tear, which means that more than likely you will eventually see some thin spots showing up and maybe even a few holes here and there.
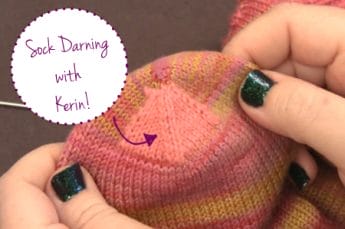
But just because one or two of your toes have started poking through small holes, that doesn’t mean it’s time to say “goodbye” to your favorite pair of socks – it just means it’s time for a wee bit of darning! And to help you whip your next pair of socks back into working order, we have a handy video tutorial where Kerin shows you how to repair holes at the toe.
Holes along the heel and toe are fairly common when it comes to well-loved socks, as this is where a lot of the friction comes into play as you slip your shoes on and off. Many knitters find holes along the toe particularly challenging due to the shaping that happens along the front edge of the socks. Created by a series of increases or decreases (depending on if you knit the socks from the toe up or cuff down), the toe of a sock has to be reshaped by reverse engineering your construction.
With this in mind, what you’ll be doing to repair a hole at the toe is knit a patch directly onto and over the hole, going beyond the edge of the hole itself. At the same time, shaping will be incorporated into the patch to mirror the increases or decreases of your socks.
And of course, for those who like to take the preventative approach – this technique can also be used before thin and worn spots of your socks turn into holes. In either case, darning adds years of life to your handknit socks!
Do you have any tips or tricks for repairing well-loved handknits?