
A dropped stitch is something that probably most knitters have had to face at one point or another. It can be quite the frightening sight to see a stitch just hanging out somewhere in your knitting, far away from the needle where it should be nicely nestled on top of. Knowing how to pick up your stitches can help save a project just when you think all is lost and also prevent rows and rows of stitches from being ripped back.
And to help you conquer those dropped stitches, we put together this handy video tutorial that will guide you through each step as you work your stitch back up to your needle. Not only do we show you how to pick up a dropped stitch on both the knit and purl side of stockinette stitch, but also on garter stitch fabric. So grab a crochet hook, and get ready to pick up some stitches!
There are many ways a dropped stitch can happen. Maybe your needles were set down mid-row with the stitches a bit too close to the tip. Or maybe, you were trying to knit as fast as possible (like me!) and one stitch was able to jump off the needles. Either way, knowing how to pick up stitches can help you keep your cool in the middle of what could be an almost-disaster.
Personally, I find picking up stitches on the knit side of stockinette fabric the easiest. Picking up a dropped stitch on the purl side of stockinette stitch fabric can be a bit trickier, since you are essentially using the same motion and technique as for the knit side but backwards and flipped around. Finally, I find picking up stitches on garter stitch the trickiest of all three techniques – which is kind of funny to me, since knitting garter stitch is the easiest and most basic stitch! This is due to the fact you are creating garter stitch with your dropped stitch from one side only. If you are familiar with working garter stitch in the round, you’ll know that you have to knit one row, then purl one row. The same idea applies when you are picking up a dropped stitch on garter stitch.
I would suggest making a swatch where you can practice all of the different ways of picking up stitches. That way, you can make mistakes and practice each method until you are comfortable with it. Practicing on a swatch also prevents the “I’ve got to get this right on the first time” syndrome, letting you experiment with the different techniques and stitches. Then, you’ll be able to feel confident in fixing any dropped stitches that you may encounter in future projects.
If you do notice a dropped stitch, you want to be sure to catch it on
the row that it dropped from. If you drop a stitch and don’t notice it
until a row or two later, you will have to rip back that row or two in
order to pick that stitch up correctly.
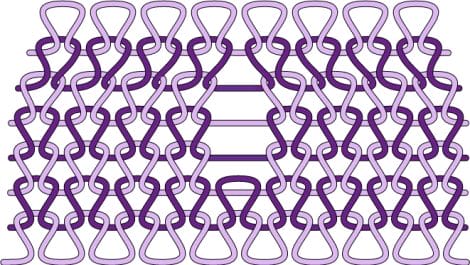
If you look closer at the illustration, you’ll see a dropped stitch and the ladders or bars that we went over in the video tutorial. You can easily see that if you continue to knit after your stitch drops, you will be essentially closing off the column or pathway of your dropped stitch. The column of stitches to the left and right of the dropped stitch come together, eliminating a space for your dropped stitch to move up through. So, it is best to keep an eye on your knitting as you work to spot any dropped stitches as early on as possible.
Do you have any tips for picking up drop stitches? I’d love to hear them!